Grading profiles are one of the most important elements of the entire program and if understood correctly can save so much time and effort.
Every student created will need a profile assigned to their file. The grading profile tells the program how fast the student needs to type, how many errors they are allowed to have, how many times they need to successfully complete a line, and so much more. If the student doesn’t meet the standards of the grading profile assigned to them they cannot move on or get a passing grade in the program.
A profile is the criteria the student will be graded by in the program. The profile is assigned by student which means you can individualize the program to the differing abilities of students. You can have more than one profile assigned to different students in a single class. EX: You might create Beginner, Intermediate, and Advanced profiles for the varying skill levels of students in a single class.

When you select the Grading Profiles button in the Main Navigation section a box will appear, like the image above, displaying your profiles and basic information about them. The first column of the table will display the profile names. We suggest you be pretty specific when naming the profiles so they are easy to assign to the right students later on. The second column shows the minimum Words Per Minute required for a line to be graded. The Scores Required column simply shows how many times a student must successfully complete a line in order for that line to be complete. The last column shows you how many students are assigned any given profile. For example, the 30 wpm 2020 profile is assigned to 7 students.
When you select a profile (click on the name once) a box will appear on the right. This box displays a simple overview of the settings for the selected profile. You can look at all the settings by clicking on the three tabs: Timing Options, Additional Options, and Assigned Sections.
Timing Options
There are only 7 preset timing lengths in our keyboarding programs: 15 and 30 second, and 1-5 minutes. For each timing length you have certain settings you can change. Max Errors should be set to the maximum number of errors you will allow the student to have for that timing length. When you first create a profile our recommended max error settings will be applied, however you can change those to whatever you would like. A good rule of thumb is 1 error allowed per minute.
If the No Correction box is checked they will not be able to use any correction key: backspace, arrow keys, home, delete, mouse clicks, and anything else a student can use to make corrections.
You can adjust the scoring capabilities of individual timings and how they factor in to the student’s final grade. If you want to place a higher emphasis on longer timings, increase the Timing Weight for the 3,5 and 5 minute timings. If you want to make a specific timing length “optional”, you can set the weight to 0. Setting all weights to 0 will result in a 0 average and a 0 final grade.
Be sure to click “Save” after making changes.

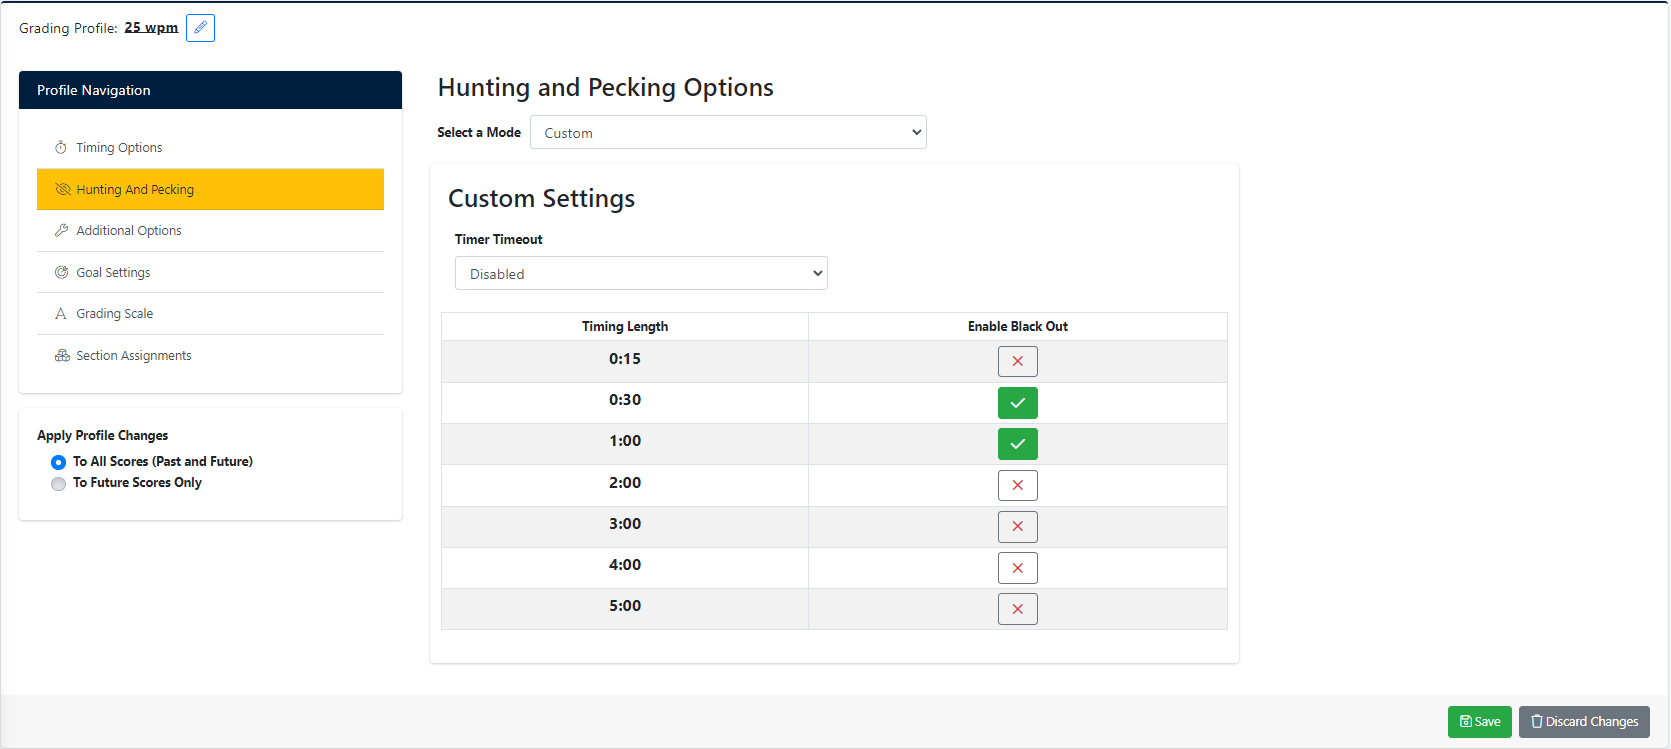
Hunting and Pecking
Select a Mode is a quick way to decide how difficult you want to make the program. These settings have been proven to kick the students habits of Hunting and Pecking. We have several different modes to choose from-
Beginner– The Black Out Timing is enabled for 15 second timings, and the Timer Timeout is set for 3 seconds.
Effective– The Black Out Timing is enabled for 15-second, 30-second, and 1-minute timings, and the Timer Timeout is set for 2 seconds.
Brutal– The Black Out Timing is enabled for ALL timings, and the Timer Timeout is set for just 1 second.
If the Blackout option is checked this will cause the student’s entry textbox to “blackout” as soon as they start typing. This is one of our proven methods to help break hunting and pecking. The following image shows how that works in the student side of the program.

Timer Timeout: This setting is designed to break hunting and pecking. If you were to set the timer for 3 seconds, it would start a timer in the background when a student starts typing. When the student pauses for 3 seconds during the timing, it stops everything and resets the timing on the student.
The timer timeout is a feature that serves 2 purposes. First, it keeps students actively typing for the full length of the timing. If this feature is enabled and a student pauses for too long, they need to repeat the work they did. The students will learn real fast not to stop typing during a timing. The second reason is that it prevents Hunting and Pecking. If you set the timer to 2-3 seconds you cannot hunt and peck. When you hunt and peck, you pause typing to look up and memorize new text before looking down and starting again. If you want to stop hunting and pecking, set the Timer Timeout to 2-3 seconds and use the Blackout Timing feature.

Additional Options
Scores Required: In order for a timing to be marked as complete, the timing must have a set number of valid scores. You can require 1 or more valid scores. You can increase the number of scores required to lengthen the course if students are rushing through it too fast. Valid scores are scores that meet the minimum speed and accuracy requirements you set. If a score is invalid, it does not save. Only valid scores save. Students are alerted when their scores do not reach the threshold you set, and will not see their score saved.
Minimum WPM: This is the standard for Words per Minute. If a student fails to type faster than the minimum speed you set here, their score will not save and they will need to repeat the timing.
A word is defined as 5 characters that were typed. “hello” is a word. “this “ is a word (notice the space counts as a character). So 16 WPM in a 15 second timing means they typed 4 words in the timing (15 seconds is a quarter of a minute), which is 20 characters.
Apply Profile: You can choose to have this profile be applied universally to all past scores or only to scores from a specific date onward.
- All Past Scores
- If you apply the profile to “All Past Scores”, and older scores do not meet these new standards then they will be marked as invalid and will be shown in red on the students’ reports. Students will need to make up all invalid work in order to continue progressing through the course.
- Specific Date
- If you select specific date, you will need to specify a date. The profile changes will accept all past scores as valid. Any scores from that date onward which are invalid will be marked in red on the students’ reports. Students will need to make up invalid work before continuing in the course.
Suggestion – If you are creating a profile for new students in the course, it doesn’t matter what you put if you are modifying a current student’s profile to make it more difficult, apply it to all past scores only if you want them to make up previous work. If you don’t want that to happen, select to apply scores from a specific date onward, and then choose today’s date.
Space After Punctuation: Have students use 1 space after punctuation or 2 spaces. The industry now recommends only a single space after all punctuation as word processors will add extra buffers automatically after sentences and punctuation. If you still prefer to use 2 spaces, you can.
Disable Lesson Skipping: No Checkmark indicates that students cannot skip ahead to future lessons until the current lesson is complete. If you check the box, the student can skip to any lesson without completing the previous one.
Yes, inside a lesson, a student could move to the last line without completing the previous line. The reason that students can skip inside a lesson is to help alleviate frustration. If a student has attempted the same timing multiple times and cannot complete it, they would get frustrated and sick of typing very quickly.
There are two ways a student can skip lessons. The first is if they go to “optional” lessons. These are lessons that are mission the checkbox next to them, and are not required. If a student does work in the optional timings, it isn’t helping or hurting their score. Second, if the student moves to a new “section”. The program is broken down into “section” which you can see in the Section Assignments tab. Students can skip between sections as some instructors assign lessons in different orders and want students to move between sections to complete assignments.
Disable Anti-Cheat Module: A checkmark turns off the Anti-Cheat Module. No checkmark means the Anti-Cheat Module is enabled and the students are unable to cheat.
Behind the scenes, there is a program running and watching students type. It analyzes their typing patterns, habits, and scores. If something is amiss (student cheating), the program examines the student a little more closely. If the student is cheating, the program will catch the student. Once caught, the student is logged out and locked from logging back in. You can unlock the student when looking at the student in the Classes section of Teacher Manager, and will be required to enter the admin password.
We have blocked “Copying and Pasting” automatically on the student program, and that solves at least 99% of the issues with students trying to cheat. There are however “Auto Typers”, “Typing Bots”, and “Typing Macros” that exist. Basically it is a program that will do the typing for the student. The student can point out or copy a block of text to the program and the program emulates the student typing. You can see programs or videos on Google: https://www.google.com/webhp#q=typing+bot.
Disable Password Changes: A checkmark blocks students from updating their passwords. No checkmark means that students can change their passwords.
Students can see their passwords. From the Class Section, you are able to view all students and their current passwords. We recommend allowing students to change their password to make it easier for them to remember. If a student forgets their password you can look it up and let them know, or change it to something new for them.
Disable Email Entry: A checkmark blocks students from updating/adding their email address. No checkmark means that students can update/add their email address. You can view a student’s info in the Classes Section.
Disable Phone Enter: A checkmark blocks students from updating/adding their phone number. No checkmark means that students can update/add their phone number. You can view a student’s info in the Classes Section.
Require Course Entry/Exit: This option allows you to require students to take a pre-test before starting their work, as well as requiring a post-text/final before their final grade will be shown. Checking the box makes the timings required. Leaving the boxes unchecked means that they are optional. Even though the timings may be optional, students can still complete them, and you will be able to view their grades.
Goal Settings
Goal Settings allow you to set custom goals for your students.
Scores Required: Set the number of scores required per timing, before a student is able to move to the next timing.
Minimum WPM: Sets the minimum Words Per Minute required for the students to meet, in order for their score to save.
Goal WPM: The Goal WPM is set in the grading scale. This will show the students what WPM they must achieve to receive an A in the course.
Goal Effort: The Goal Effort will allow you to set either daily or weekly Effort Goals for the students to type.
Daily / Weekly: Allows you to set whether you want your students to meet either a daily effort goal or weekly effort goal.

Grading Scale
We have provided you with a simple slider mechanism so that you can quickly choose the grading scale you want for your students. It is based on their Average Words Per Minute. Let’s use the image below as an example. For an A, the student must have an Average WPM of at least 35, at least 30 for a B, 25 for a C, 20 for a D, and if they get below 20 they will receive an F.
To change the scale simply select the pink slider and move it to the left or right. You can also manually type in the scale in the boxes on the right hand side.

Section Assignments
Adjust the section weights to assign lessons or sections to your profile. If you leave a section assignment at 0, it will be optional and not count towards the student’s grade. For score keeping reasons, it is easier to make sure the sections assignments ad up to 100%. You can always check by looking at the bottom right of the screen. You will see a “Sum of Section Weights” followed by the total.

Created Lessons
You can assign up to 10 created lessons, and each lesson can have up to 18 timings within. To assign a lesson, select it from the drop down list and click the “Assign” button. It will be assigned as an “optional” timing because it will have a weight of 0. To make it count towards the students’ grades, adjust the weight to something higher than 0.
Tests
You can create and assign as many tests as you would like. Keep in mind that the tests have their own set of grading options that can be set for each test. Think of it as a mini grading profile that each test can have, this allows tests be be very unique and even allows you to set a date to unlock the test and password lock the tests. In the example below, the test is worth 20% of the students grade.
Lessons will show up on the student side the same way they do here. To re-order the created lessons, click and drag the list symbol to the left of the lesson. Drag it to the correct position and release the mouse to “drop” the lesson into the new order.
If the drop down does not have any created lessons, make sure you have created them first. If it still isn’t showing, make sure it is valid with at least one line/timing. If the created lesson has no timings included, it will not show up in the list.
Editing Profile
If you need to edit an existing profile you simply need to double-click on the profile name or select the profile, then click on the “Edit Profile” button on the right. You will be brought to the “Edit Profile” screen.
You can edit the profile name by clicking the pencil icon to the right of the name. Once you change the name you select the green check mark to save or the orange ‘X’ button to cancel.
If you have made any changes that you wish to reverse, you can simply click on the “Discard Changes” button at the bottom left had side of the screen. You will then be brought back to the Grading Profiles page.
Delete a Profile
When you want to delete a profile select the profile you want to delete. When you select it, a box will appear to the right displaying that profiles settings. At the top right you will see a 3 lined button. When you click on that you will see some options, one of which is Delete Profile. Select “Delete Profile”. When you select that a pop up will appear asking if you are sure that you want to delete the profile. Select “Yes, delete it!” and your profile will be deleted. If you accidentally selected delete, simply click “Cancel” and you’ll be back in the Grading Profile page.

Copy Profile
To copy a profile, you select the profile, select the top right three-lined button in the box that appears on the right, then select “Copy Profile”. You’ll be asked to provide a name for the new Profile. Just click OK when you’re done and it will be created or hit Cancel to go back to the Grading Profile page.