The introduction is an introduction to keyboarding and to the program in general. It is very brief and is generally more beneficial when guided by the instructor. Here in this guide, we will cover what each step contains and what we hope you take from it.
The SECRET to Keyboarding
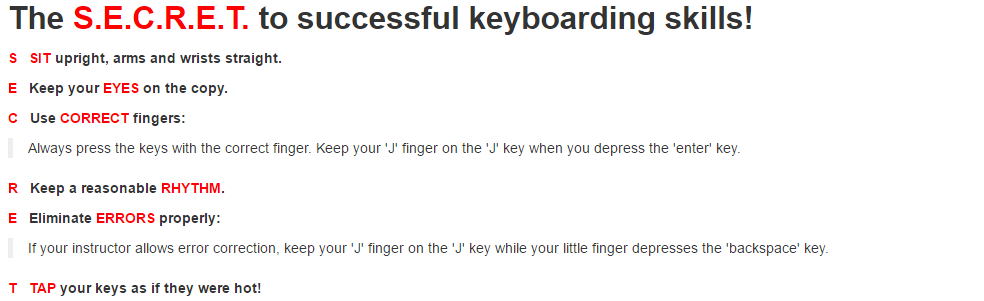
SECRET is acronym to help you remember proper typing posture and procedure. Follow the rules listed and you don’t have to worry about bad typing habits or the complications of bad typing posture.
The Home Row
The home row is where your fingers should rest when they aren’t typing. It is the middle row of the keyboard: letters A S D F J K L ;. No matter what you are typing, your fingers should return to the home row after typing a letter. It may feel uncomfortable at first if you are not familiar with typing, but as you learn to keyboard properly, you will hands and fingers will automatically rest on the home row any time you are at a keyboard.
Keyboard Chart
The keyboard chart on step 3 is interactive! The colors correspond to the finger that should press the key. Blue keys are pressed by your pinky, red by your ring finger, green by your middle finger, and yellow by your index finger. Your thumbs should rest on the keyboard and are only used for pressing the keyboard. Click the different keys on the keyboard chart and see what finger you should use for each key.
Using the Spacebar
Step 4 covers how to use the spacebar. You will use one of your thumbs to strike the spacebar between words. It doesn’t matter which thumb you use, but keep it consistent. It tends to be easier for right-handed people to use the spacebar with their right thumb. The typing box on Step 4 will allow you to practice typing the letter J and spaces. It is not required or graded, but will allow you to practice.
The Enter Symbol and Key
The program uses the Enter Symbol (↵) to indicate when you should use the Enter Key. Every timing you will work on has an enter symbol at the end. You will use your right little finger to hit the enter key. It travels from the semi-colon to the enter key and back. The text talks about how this is a large reach, but your index finger should NEVER leave the J key. If your middle and ring finger have to leave their keys, to help your little finger stretch, it is okay, but they should return back to their spot after striking the enter key.
The input on this step will allow you to practice typing the enter key while keeping you index finger on the J key. Try it out! It is not graded or required to move onto the next step.
Typing the Home Row Characters
There is no time limit here, and no grading. This step allows you to practice the home row characters and enter key. We recommend running through this a few times if possible because the home row needs to be second nature. See if you can do it without looking the first time. We aren’t trying to trick you, the letters are in order. The more you practice without looking, the faster your hand-eye coordination and muscle memory will develop.
Congratulations!
This step gives a few more tips and prepares you for your first timing, which you will take on the next step.
Your First Timing
This screen can look a little intimidating at first, so here is a break down on everything you need to know about this screen that you will see for all lessons in the future.
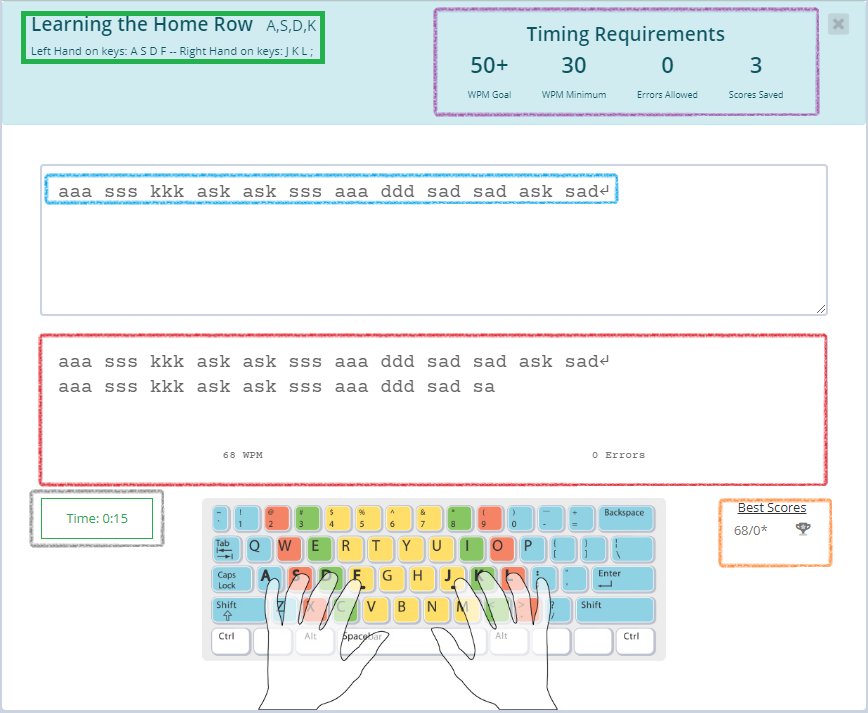
- Green Area – This area will often times show you hints or tips that you should read and follow. In the example above, it reminds you that if you finish the line, you should hit Enter and start over again.
- Purple Area – This area will be visible when you are learning new keys. It will show you the home row as well as the row(s) of the keyboard where the new keys are. It will even have a button in some timings that will show you the “reach”, which is keyboard jargon for which finger you should use to reach the new key. Since this is the very first timing, it will only show the home row.
- Blue Area – This is the text you are to type. You will type it into the box outlined in red. Notice the enter symbol at the end!
- Violet Area – These are your requirements for the timing. In the example above, 1 error is allowed with 1 WPM required, and I only have to have 1 score to mark the timing as complete. If I fail to reach these standards (too many errors or too slow of speed), it will let me know where I messed up and have me retake the timing.
- Red Area – This is the box you will type the text above into. The timer (outlined in black) will start immediately when you press the first key and will count down to 0. Keep typing until you can’t type anymore. After the timing is over, the corrected text will appear as well in this area, showing you your mistakes and where you can improve.
- Orange Area – This area showcases your top 3 scores (top 5 if you are using Ten Key Mastery). In the example above all you see are 3 forward slashes (“/”) which indicate there is no score yet. When scores appear they will be shown as Speed/Errors(or Accuracy Percentage). A score of 35/1 means 35 WPM with 1 error.
- Black Area – This area is the timer. As soon as you start typing in the red area, the timer will start. When the timer reaches 0, it will prevent further typing and the text will be send off to be corrected and saved. If you made a mistake and want to start over, just click the timer; it will reset everything back to the beginning and you can start over again.
If you reach the end of the timing before the timer is up, hit "Enter" and start over from the beginning. Keep typing until the timer runs out!
If you see "Timing in Progress", keep on typing. That is the black out timer!
Your Scores
This chart is a little intimidating at first, especially if you haven’t used the program much. The report show a record of all your scores since you began the program, as well as information about how much work you have done, and your overall average. See the chart and legend below.
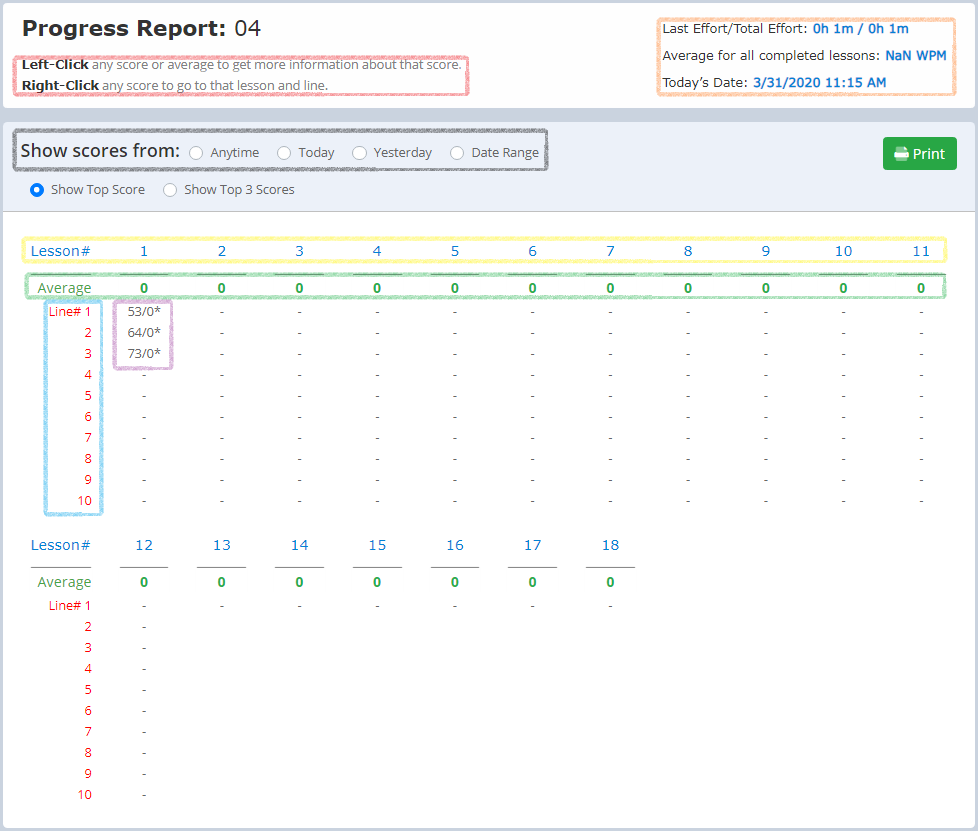
Black Section – This allows you to filter scores to a specific date range. You can see what you did today, last week, or all past scores.
Green Print Button – This allows you to print your report. Your browser should allow you to even “print” to a PDF if you want to save a record of your scores.
Red Area – The text here indicates some things you can do with this report. If you click on any score, a pop-up box appears with detailed information about your scores. If you want to retake a specific score, right-click that score and you will be able to revisit that timing and try for a higher score.
Orange Area – This area shows Effort, Average, and Today’s Date. Effort is the amount of time you spend typing in the program. If you take a 15 second timing, you get 15 seconds worth of effort. If you take a 1 minute timing and quit after 10 seconds, you get 10 seconds worth of effort. The average is the average of all lesson averages, just look at it to get an idea of what your final grade might be.(this number will only appear after an entire lesson has been completed)
Yellow Area – This area shows the lesson numbers. Lessons start at 1 and go up from there to the right.
Green Area – This area shows the average for the lesson number indicated above. If it is showing 0, it means it isn’t completed, or perhaps there is a weighting issue that your instructor may need to fix. If you are curious about the 0, click on it and it will tell you why it is 0.
Blue Area – This area shows the line numbers. Each lesson is composed of several lines. This dates back to when students would type lines out of a textbook. The naming convention has stuck with the program, but essentially, each “line” is a timing or drill that students need to complete for that lesson.
Purple Area – This area is where a score will be. The purple area in the image above shows a “/” for Lesson 1 Line 1. A slash means there is no score yet. If you have a score, it will appear something like 15/0, indicating 15 WPM with 0 Errors.
More Tabs
Step 10 gives more tips about using the program. Read through them. They are important, and may help you in the course if you have questions.